Object Detection with R on Windows
Package image.darknet
Computer vision is becoming more and more accessible. One simple way to
try it out by yourself has been made possible by the R package
image.darknet
which provides an easy to use interface to image classification and
object detection based on
darknet.
A blogpost by AbdulMajedRaja RS explains how you can use this package with a Tiny YOLO model for object detection on images. It takes only three lines of R code to detect objects on a given image. An example of model’s output is shown below.
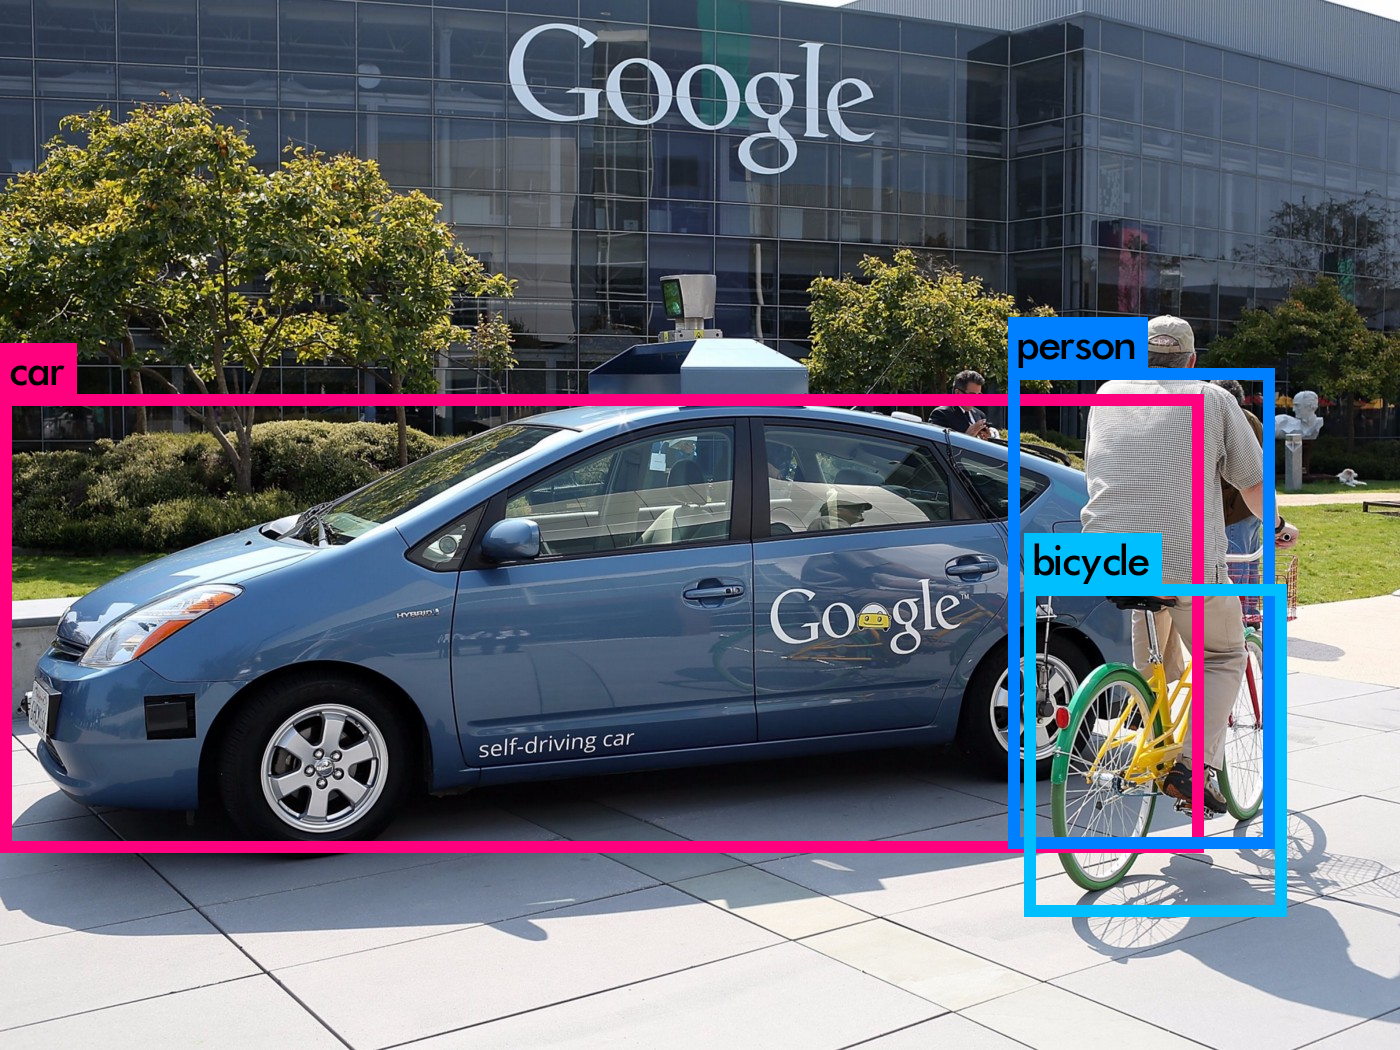
Photo by Justin Sullivan/Getty Images
The package is a wrapper for running the C coded darknet engine. Object detection is therefore performed locally without any external dependencies on Tensorflow and Python.
Capturing the Output (on Windows)
One drawback of this package is that it doesn’t (yet?) output the types and numbers of the detected objects back to R for further analysis. The latest package version that I’m using at the time of this writing is version 0.1.0.
Duncan Golicher shows in his blogpost a nice trick you can use to access the above-mentioned data. His code, however, was written on a Unix-like OS and doesn’t work on Windows. Below is my modification of Duncan’s code which solves this problem.
Installing the Package
Because the package image.darknet is currently only available on
Github, you have to install it with the devtools package. In case you
don’t yet have devtools installed, you need to do this first.
# install.packages("devtools")
During the installation on Windows, you will prompted to also install
Rtools. When
devtools is ready, you can install
image.darknet:
# devtools::install_github("bnosac/image", subdir = "image.darknet", build_vignettes = TRUE)
Setting up and Running the Detection Model
We first load all the required libraries and then set up the Tiny YOLO model as described in package documentation:
# Object detection on images on Windows.
# Adaptation of the original code by Duncan Golicher: https://rpubs.com/dgolicher/yolo

library(image.darknet)
library(Rcpp)
library(dplyr)
library(tidyr)
library(here)


## define the detection model (YOLO)
detect_model <- image_darknet_model(
  type = "detect",
  model = "tiny-yolo-voc.cfg",
  weights = system.file(package = "image.darknet", "models", "tiny-yolo-voc.weights"),
  labels = system.file(package = "image.darknet", "include", "darknet", "data", "voc.names")
)
The images that we are going to use in this example are located in
subfolder img in our working directory. We are going to save the
output images to the subfolder pred.
# folder with input images
path <- here("img")

# get all pngs and jpgs
images <- dir(path = path, pattern = "\\.png|\\.jpg|\\.jpeg")

# folder for output images with predictions
dir.create('pred')
We next define a function that we are going to apply to all the images.
Note that there is a detection threshold parameter inside this
function that you can change to filter out detections with class
probabilities below this threshold.
# function to be applied to images
detect_objects <- function(x) {

  filename <- paste(path, x, sep = "/")

  prediction <- image_darknet_detect(
    file = filename,
    object = detect_model,
    threshold = 0.19
  )

  file.rename("predictions.png", paste0("pred/", x))
  return(prediction)
}
By default, the function image_darknet_detect produces a new image
called predictions.png in the working directory showing the objects
found. We copy this image into the folder pred and rename it back to
the original. The output of function image_darknet_detect (variable
prediction) is, however, empty. The result is invisible. Duncan fixed
this inconvenience with a “minor hack”. The output of the C coded model
was redirected from stdout to a file that can be read back into R.
On Windows we have to define two cpp functions. The first one, redir,
redirects stdout to a file capture.txt. The second one, resetredir,
resets this redirection back to the console.
cppFunction('void redir(){FILE* F=freopen("capture.txt","w+",stdout);}')
cppFunction('void resetredir(){FILE* F=freopen("CON","w+",stdout);}')
We can now apply the detection function to our images:
redir();
d <- lapply(images, detect_objects)
resetredir();
Output images in the pred folder have now been created as well as the
file capture.txt. Let’s take a look at
it.
writeLines(readLines('capture.txt'))
## C:/Users/tomaz/Desktop/object detection/img/dog.jpg: Predicted in 3.263000 seconds.
## Boxes: 845 of which 3 above the threshold.
## car: 76%
## bicycle: 24%
## dog: 79%
## C:/Users/tomaz/Desktop/object detection/img/test_image.jpg: Predicted in 3.274000 seconds.
## Boxes: 845 of which 3 above the threshold.
## car: 97%
## person: 37%
## bicycle: 49%
Reformatting the Output
The following code takes this file and reformats it to the final dataframe.
# Read in the output file
d <- data.frame(txt = unlist(readLines("capture.txt")))

## Take out all the lines that we don't need.
d <- d %>%
  filter(!grepl("Boxes", txt)) %>%
  filter(!grepl("pandoc", txt)) %>%
  filter(!grepl("unnamed", txt))

## Find the lines that contain the file names. Make a logical vector called "isfile"
d$isfile <- grepl(path, d$txt)

## Take out the path and keep only the file names
d$txt <- gsub(paste0(path, '/'), "", d$txt)

## Make a column called file that contains either file names or NA
d$file <- ifelse(d$isfile, d$txt, NA)

## All the other lines of text refer to the objects detected
d$object <- ifelse(!d$isfile, d$txt, NA)

## Fill down
d <- tidyr::fill(d, "file")

## Take out NAs and select the last two columns
d <- na.omit(d)[, 3:4]

# Separate the text that is held in two parts
d <- d %>% separate(file, into = c("file", "time"), sep = ":")
d <- d %>% separate(object, into = c("object", "prob"), sep = ":")
d <- d %>% filter(!is.na(prob))

# Keep only the prediction time
d$time <- gsub("Predicted in (.+).$", "\\1", d$time)

# Convert probabilities to numbers
d$prob <- as.numeric(sub("%", "", d$prob)) / 100

# Optionally remove the file
# file.remove("capture.txt")
Results
d %>% knitr::kable()
| file | time | object | prob |
|---|---|---|---|
| dog.jpg | 3.263000 seconds | car | 0.76 |
| dog.jpg | 3.263000 seconds | bicycle | 0.24 |
| dog.jpg | 3.263000 seconds | dog | 0.79 |
| test_image.jpg | 3.274000 seconds | car | 0.97 |
| test_image.jpg | 3.274000 seconds | person | 0.37 |
| test_image.jpg | 3.274000 seconds | bicycle | 0.49 |
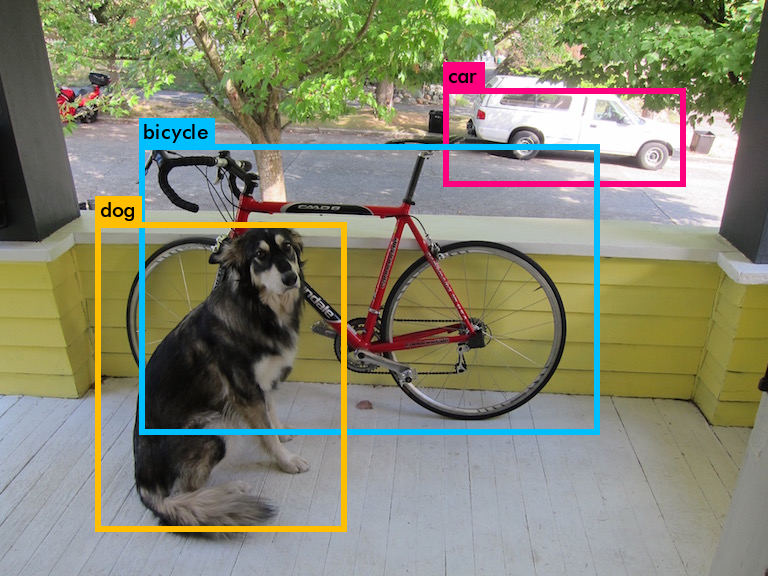
dog.jpg
test_image.jpg
If you want to know more about building computer vision models with R, I would recommend the book Deep Learning with R by Francois Chollet and J. J. Allaire:
Found this content interesting or useful? Fuel future articles with a coffee!

Session Info
sessionInfo()
## R version 3.6.1 (2019-07-05)
## Platform: x86_64-w64-mingw32/x64 (64-bit)
## Running under: Windows 10 x64 (build 18363)
##
## Matrix products: default
##
## locale:
## [1] LC_COLLATE=Slovenian_Slovenia.1250  LC_CTYPE=Slovenian_Slovenia.1250
## [3] LC_MONETARY=Slovenian_Slovenia.1250 LC_NUMERIC=C
## [5] LC_TIME=Slovenian_Slovenia.1250
##
## attached base packages:
## [1] stats     graphics  grDevices utils     datasets  methods   base
##
## other attached packages:
## [1] here_0.1            tidyr_1.0.2         dplyr_0.8.4
## [4] Rcpp_1.0.3          image.darknet_0.1.0
##
## loaded via a namespace (and not attached):
##  [1] knitr_1.28       magrittr_1.5     tidyselect_1.0.0 R6_2.4.1
##  [5] rlang_0.4.4      stringr_1.4.0    highr_0.8        tools_3.6.1
##  [9] xfun_0.12        ellipsis_0.3.0   htmltools_0.4.0  rprojroot_1.3-2
## [13] yaml_2.2.1       digest_0.6.25    assertthat_0.2.1 lifecycle_0.1.0
## [17] tibble_2.1.3     crayon_1.3.4     purrr_0.3.3      vctrs_0.2.3
## [21] glue_1.3.1       evaluate_0.14    rmarkdown_2.1    stringi_1.4.6
## [25] compiler_3.6.1   pillar_1.4.3     backports_1.1.5  pkgconfig_2.0.3